Snow control fence is designed to redirect snow drifts and reduce the wind speed. If installed properly, snow fencing can significantly slow down the wind, creating a snow drift to pile up on the downwind side of the fence instead of the driveway. What is more, high visible snow fencing is lightweight for one-person to handle and erect. 100% UV stabilized high density polyethylene barrier mesh will not become fragile in any cold weather. Compared with traditional wooden snow fence, plastic snow barrier fence is lighter in weight, more economical and save time in installation.
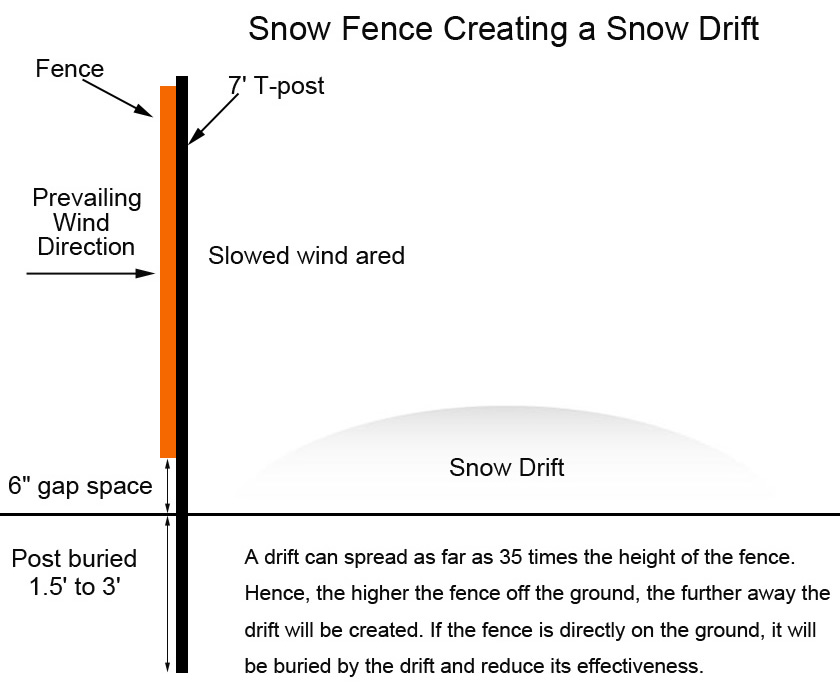
SFI-01: Snow fence installation sketch.
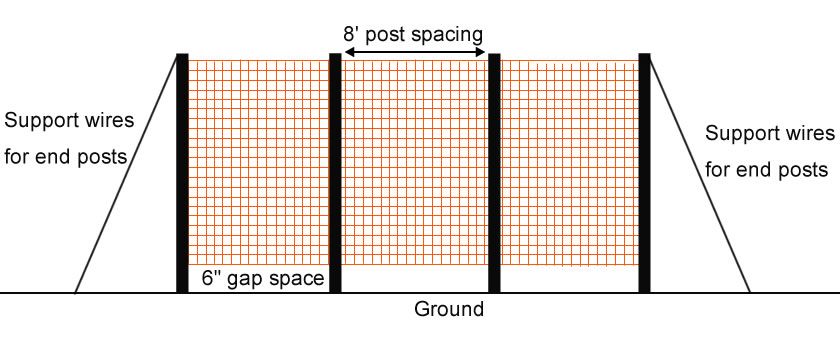
SFI-02: Snow fencing.
Steps of Snow Fence Installation:
Step 1: Research.
- Wind direction - The direction of prevailing winds in your area can be found in meteorological data from weather stations. Snow fence should be installed perpendicular to the wind direction for optimum drift control.
- Snow transport - when winds of less than 20 mph, 90% of the blown snow stays below 4 ft. In winds of less than 45 mph, 70% of the blowing snow remains below the 4 ft.
- Fence to desired drift-free area: 35 times the height of the fence. For a 4 ft high fence, the distance would be 140 feet.
- Fence alignment - If the wind is within 25 degrees of being perpendicular to the roadway, place the fence parallel to the road. If the wind direction is parallel to the road, fences should be placed perpendicular to the wind direction.
Step 2: Preparation.
- Plastic snow fence - 40 - 50% porosity is recommended.
- Fence bottom gap: 6 inch.
- T-post: at least 6 ft.
- Wood slat: 1" × 2" × 4".
- Cable ties: 10 inches.
Step 3: Installation.
- Determine the direction of the fence.
- T-posts should be inserted in the ground at least 1.5 inch and a maximum of 8 feet apart.
- Vertical strands of plastic fence should be sandwiched between the flat side of T-post and wood slat by cable ties.
- Xingying the next roll by overlapping at least 6 inches of the fence at the last T-post.
- 6 inches gap between the ground and fence bottom for longer and higher snow drift.
- For areas with heavy snow and wind loads, support wires should be used to stabilize end posts to prevent sagging.
Products List
- Orange Barrier Fencing Mesh
- Snow Safety Fence
- Black Plastic Barrier Fencing
- Blue Barrier Fencing Mesh
- Green Barrier Fencing Mesh
- Yellow Barrier Fencing Mesh
- Pink Barrier Fencing Mesh
- Diamond Mesh Safety Fence
- Oval Plastic Barrier Mesh
- Square Mesh Barrier Fence
- Barrier Mesh Fencing Accessories